Behind our Television in our sitting room is a HUGE blank space since we decorated the living room. Now don't get me wrong I love the new decor but none of our old art work seemed to fit in and we liked the clean feel of the room.
Now, we are six months in and that feeling is wearing thin. I want a bit of interest, particularly in that spot. You can't inhabit blogland or buy craft magazines at the moment without seeing the beautiful embroidery hoop art arranged in a gallery style that is made with lovely fabrics both embellished and not. The colour scheme in our sitting room is duck egg blue and stone with off white paint work and I didn't think the wood grain looked very good with it though.
Okaaaay, so I feel a project coming on and I think it's going to be a big one.
Now I don't have loads of embroidery hoops just lying around (just the one I use!) and they don't come particularly cheap (the ones I use in this tutorial were £2.99 each, which x3 adds up and they are the small ones!) so the final project may take a while. Here we go on how I did stage one...
Step One:
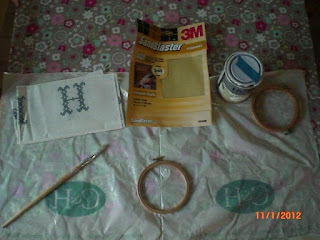
I gathered the kit that I needed.
- The hoops
- Fine grain sandpaper.
- The chosen fabric (more about that later).
- Satinwood paint (the same that we used on the woodwork in the sitting room).
- A fine paint brush
- Something to paint over that didn't matter if I was messy (in this case I cut open a carrier bag!)
- A tape measure/ruler
- Fabric scissors
- Fabric marker pen or chalk pencil
Step Two:
I removed all the screws etc. from the frames ( at this point you could use masking tape to cover the metal fittings but I felt I had a fine enough brush and a steady enough hand to manage to work round them!)
I removed the middles of the hoops as I figured I could get away without painting these as they wouldn't show (I'm not one for unnecessary work me!)
Step Three:
I sanded the outside ring of all three hoops reasonably gently using 240 grit (fine) sand paper. As the hoops had no finish on them this was just to "key" the surface to receive paint.
Step Four:
Wipe the dust off of the hoops with a damp cloth.
Step Five:
Jerry-rig some kind of apparatus to hang the wet, newly painted hoops from while they dry! (You'll see what I did in a minute, try not to laugh too hard!)
Step Six:
I threaded string through the screw holes of each of the hoops and tied a knot in it to make a loop, ready for hanging.
Step Seven:
Using a fine brush, paint the outside and edges of the hoops with a fine brush and a paint suitable for use on wood. I don't like high gloss finishes (and I'm tight fisted...and skint) so I used "Homebase Quick Dry Satin" in "Contemporary" which we had already used to paint the skirting boards etc. with in our room.
Step Eight:
Hang the hoops to dry. (Yes, I know I should be outside raking leaves and the kitchen tiles were here when we moved in, NOT my taste!)
Step Nine:
Repeat steps seven and eight if necessary for a good finish. I didn't need to, one coat was enough, yippee!
Step Ten:
Layout your chosen fabric on the table. I bought this
"Cross Stitch Alphabet" by Holly Holderman ( I can't seem to fins a UK based supplier) at the
"Knit and Stitch Show" in October and thought it would be nice to put each of our initials in my first three hoops.
Step Eleven:
Using a fabric marker or chalk pencil mark a circle around the hoop approx. 5cm larger than the hoop. (I have to confess that I cut a square because it gave me a more usable piece of left over fabric though!)
Step Twelve:
Cut out fabric using fabric scissors.
Step Thirteen:
Making sure the paint on the hoop is thoroughly dry sandwich the piece of fabric between the two parts of the hoop. Tighten the screw slowly stretching fabric taut as you tighten. Keep an eye open that the part of the fabric design that you want to feature stays centred.
Step Fourteen:
When the screw is fully tightened trim of the showing extra fabric with fabric scissors as close to the frame as you can.
Step Fifteen:
Treat the edges of the fabric with fray stop if your chosen fabric is one that frays easily.
And Voila...
There you have your final "pictures" ready to hang (more about that in a future post). I deliberately made sure that my screw fastenings were at different places on the edge of the hoops so as to give it a more random, homespun feel but you might prefer to line them up in a more regimental fashion!
I hope this might prove useful to you and if you visit please leave a comment. I'd love some feedback to make my blog more interesting!


