Pages

Wednesday 22 February 2012

Embroidery Hoop Art - Phase 2 ("Oh we do like to be beside the Seaside!")


Back in November I joined my sister-in-law C for a day out drooling over the loveliness of everything at the "Country Living Christmas Fair". Whilst there I discovered the wonderful work of Poppy Treffy.  She specialises in free machine applique to produce pictures and to decorate everyday things with a wonderfully whimsical, summery feel mainly inspired by her Cornwall home.  I could have bought the whole shop had funds permitted but I contented myself with buying her book (which I will NOT lend anyone because she signed it for me!)

"Free and Easy Stitch Style" by Poppy Treffy
I loved her style and was torn with indecision between itching to have a go at free machine work and being terrified that I would muck it up.  I find that "free and easy" are not two words that usually apply to my work, much to my sorrow!

Ed (long suffering husband) and I love a seaside town called Southwold, near where his family home is in Suffolk.  It is a wonderful place, very like somewhere out of a Miss Marple mystery with a pier, promenade of beach huts for hire and Lighthouse right in the middle of town.  We have spent many happy days there wandering around and playing with the children on the beach, (I have even been in swimming there, Brrrrr!).  So I decided that an idealised version of the  sea front would make a perfect image to go in our gallery of hoop art and that the free machine applique would be the perfect style to do it in.  That was the easy bit!

I spent ages with my notebook drawing circles and trying to sketch a suitably emblematic scene of Southwold to put in my picture but I wasn't happy with any of them, they were too "tight" and rigid.  Then, at the end of the day, at work I picked up a ball point pen and scribbled on a bit of scrap paper in five minutes.  Unbelievably (and typically!) I had my image!

I used the hoop I wanted it to go in as a template and then drew out the design more heavily onto tracing paper in pencil.


I then invested in a transfer pencil and traced the design on the back of the drawing.  That bit was a pain in the posterior I can tell you.  The pencil I bought crumbled as soon as I put it to paper and kept crumbling every time.  I got a sharpener and I stuck with it but it took over half of my brand new pencil to even get some semblance of lines on the page, and they weren't that clear.  I stuck with it and then set up the iron to iron it onto the linen background I'd chosen to use.  That bit was easy enough but the results weren't great.  I got just barely visible lines that involved a lot of guess work.  I think I would definitely look for another way if I was to do it again.


Rather than  use the transfer pencil again I scanned my original picture and cut out sections of it to use as patterns whilst cutting the scraps of fabric for applique.  This was a bit fiddly but I wasn't sure what else I could do!


I chose and cut the scraps from my basket to size and then used "Heat and Bond: Lite" to bond each piece to the backing so that I could attempt free machining for the first time without have to worry about the fabric moving around.


The I took the foot off of my machine, dropped the feed dogs, threaded up a navy blue top thread (I thought black would be too harsh but I wanted a dark outline that would show up) and a yellow bottom thread (a la Poppy's advice for a unique look).  I took a deep breath and took the plunge in outlining stuff.

The outlining didn't go too badly so I tried a little bit of shading on the windows,


Then I tried a adding a few embellishments like the light beams and a seagull or two;


Finally, to finish off I edged the edge of the fabric to stop it fraying and put it in the hoop to test it out (yes, I know I still need to paint the hoop but it was raining hard all day today and I didn't fancy getting soaked whilst trying to find the right colour paint in out detached garage!)


I have to say that I really love it.  It's not perfect, the stitch tension is dodgy and the back is far from neat (hence no photos of that!) but I may just be addicted to free machining! Watch this space.


Thursday 16 February 2012

Russian Dolls and fallow spots

The last couple of weeks have been a bit....fallow really.  I have had loads of projects started but none at the point of being finished and no "aha!" moments for new ones. In short I haven't had a lot to talk about!

This left me feeling a bit disatisfied with my lot and desperate for something to move in the right direction.

Finally this week something clicked and things started moving forward again.  Funnily enough it was all down to me being a bit of a miser!

Over the last eighteen months I have collected loads of business cards, postcards and contact details from suppliers of various art and craft supplies that I want to keep for future reference (like when I make my first million maybe?)  Too lazy to write or type the details into something I wanted to glue the cards straight into a book.  So I looked around for a book and all the cute ones were £10.00 or more which I wasn't prepared to pay.  Hunting around at home for something to substitute I found a project book that I had bought to house my endless "To Do" lists whilst still teaching and never used.  It had dividers, it had a spiral binding and it was REALLY ugly!

So out came the felt and the cotton perle thread and off I went.   I measured around the outside of the cover with it shut so that I got the longest distance of felt that I would need with the book closed.  I then used fabric glue to glue a strip of felt inside the area where the spiral bound spine would go so that it wouldn't poke through the stretched felt.

I glued the edges of the inner sleeves into place and then stitched around in blanket stitch (which I really love) with cotton perle.  I think than cotton perle stands out more than stranded cotton and I find it easier to stitch with when using the full thickness of the thread.
During this time I had a bit of inspiration.  I know that Russian dolls are currently very trendy but I have always loved them and collect them so I figured why not put one on the front of my contact book?  I added a little stitched embellishment (I learnt those stitches in Primary School and was honestly amazed that I could still remember how to do them!)  I'm really pleased with how it turned out.

Anyway, that seems to have restored some of my mojo (laughs sarcastically) because I have come up with a template for something new, original and exciting (well, at least to me) for my ongoing embroidery hoop gallery.  Here's a sneak peek...


Byeee...

Tuesday 24 January 2012

The Teddy Bear's Picnic


My niece loves to have tea parties with her "baby" Max and her other toys.  She is a very girly girl and has firm opinions about the colour pink and who should (and more importantly should not!) wear it.

For Christmas I decided to make her a picnic blanket so that she and her friends could really dine in style!

I bought a remanant of pink fleece that gave me a square one metre in size and splurged on some Tinkerbell blanket binding and webbing that was such a cute mauve colour that I couldn't resist.

I read a load of tutorials on putting blanket binding on but I have to say that I found it surprisingly difficult.  No matter how I pinned or tacked it it seemed to ruckle up as I sewed. After I had finished swearing, huffing and puffing I unpicked it and tried again.  After about three repeats of this with the air turning progressively more blue with each one I finally got the best results I could (but definitely not perfect) by using basting glue.

I really wanted the blanket to fold up into a sweet carry case so I cut another piece of fleece from my remenant and edged it with oridnary double fold bias binding, which was a LOT easier than the blanket binding.

I attached the webbing in two carry handles and some at the sides to fasten with Velcro.  I ironed on some transfer letters to spell her name and stitched that to the front.  Then I stitched the rectangle to the blanket. Voila, the Teddy bears were ready for their picnic...


And we're ready for the off...


Stage One of the unfolding process.
Stage Two.

Stage Two from the underside.

Today's the day the Teddy Bears have their picnic!

I hasten to add that all props used in these photos are mine, not hers (Yes I know it's sad that I have Teddy Bears but at least it's my best china!).

She loved the blanket and I am told that she has been going on many "days out" in her play Camper Van with toys and a picnic!  That makes me very happy!

Wednesday 18 January 2012

Embriodery Hoop Art - Phase 1

Behind our Television in our sitting room is a HUGE blank space since we decorated the living room.  Now don't get me wrong I love the new decor but none of our old art work seemed to fit in and we liked the clean feel of the room.

Now, we are six months in and that feeling is wearing thin.  I want a bit of interest, particularly in that spot.  You can't inhabit blogland or buy craft magazines at the moment without seeing the beautiful embroidery hoop art arranged in a gallery style that is made with lovely fabrics both embellished and not.  The colour scheme in our sitting room is duck egg blue and stone with off white paint work and I didn't think the wood grain looked very good with it though.

Okaaaay, so I feel a project coming on and I think it's going to be a big one. 

Now I don't have loads of embroidery hoops just lying around (just the one I use!) and they don't come particularly cheap (the ones I use in this tutorial were £2.99 each, which x3 adds up and they are the small ones!) so the final project may take a while.  Here we go on how I did stage one...

Step One:
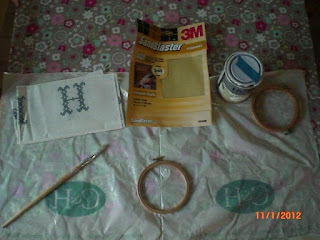
I gathered the kit that I needed. 
  • The hoops
  • Fine grain sandpaper.
  • The chosen fabric (more about that later).
  • Satinwood paint (the same that we used on the woodwork in the sitting room).
  • A fine paint brush
  • Something to paint over that didn't matter if I was messy (in this case I cut open a carrier bag!)
  • A tape measure/ruler
  • Fabric scissors
  • Fabric marker pen or chalk pencil

Step Two:
I removed all the screws etc. from the frames ( at this point you could use masking tape to cover the metal fittings but I felt I had a fine enough brush and a steady enough hand to manage to work round them!)

I removed the middles of the hoops as I figured I could get away without painting these as they wouldn't show (I'm not one for unnecessary work me!)

Step Three:
I sanded the outside ring of all three hoops reasonably gently using 240 grit (fine) sand paper. As the hoops had no finish on them this was just to "key" the surface to receive paint.

Step Four:
Wipe the dust off of the hoops with a damp cloth.

Step Five:
Jerry-rig some kind of apparatus to hang the wet, newly painted hoops from while they dry!  (You'll see what I did in a minute, try not to laugh too hard!)

Step Six:
I threaded string through the screw holes of each of the hoops and tied a knot in it to make a loop, ready for hanging.


Step Seven:
Using a fine brush, paint the outside and edges of the hoops with a fine brush and a paint suitable for use on wood.  I don't like high gloss finishes (and I'm tight fisted...and skint) so I used "Homebase Quick Dry Satin" in "Contemporary" which we had already used to paint the skirting boards etc. with in our room.

Step Eight:
Hang the hoops to dry. (Yes, I know I should be outside raking leaves and the kitchen tiles were here when we moved in, NOT my taste!)


Step Nine:
Repeat steps seven and eight if necessary for a good finish.  I didn't need to, one coat was enough, yippee!

Step Ten:
Layout your chosen fabric on the table. I bought this "Cross Stitch Alphabet" by Holly Holderman ( I can't seem to fins a UK based supplier) at the "Knit and Stitch Show" in October and thought it would be nice to put each of our initials in my first three hoops.


Step Eleven:
Using a fabric marker or chalk pencil mark a circle around the hoop approx. 5cm larger than the hoop. (I have to confess that I cut a square because it gave me a more usable piece of left over fabric though!)

Step Twelve:
Cut out fabric using fabric scissors.


Step Thirteen:
Making sure the paint on the hoop is thoroughly dry sandwich the piece of fabric between the two parts of the hoop.  Tighten the screw slowly stretching fabric taut as you tighten.  Keep an eye open that the part of the fabric design that you want to feature stays centred.


Step Fourteen:
When the screw is fully tightened trim of the showing extra fabric with fabric scissors as close to the frame as you can.


Step Fifteen:
Treat the edges of the fabric with fray stop if your chosen fabric is one that frays easily.

And Voila...

There you have your final "pictures" ready to hang (more about that in a future post). I deliberately made sure that my screw fastenings were at different places on the edge of the hoops so as to give it a more random, homespun feel but you might prefer to line them up in a more regimental fashion!


I hope this might prove useful to you and if you visit please leave a comment.  I'd love some feedback to make my blog more interesting!

Monday 9 January 2012

Un Petit Cadeau

We have some wonderful friends in the village who are never failing in their support and care during difficult times. They are a remarkable family. Mum is the most staggerly organised person I know running husband, three children and a large dog and making it look effortless! Dad is in the armed forces and travels a lot. They have basically gutted their house and redone it completely and it looks gorgeous. Anyway, before you are physically sick at these paragons (and I spoil it by telling you how much I get teased by Dad!)I wanted to show you the Christmas present that I made them. I wanted to make them something personal but useful. I settled on a cushion because:

a) It was within my sewing capabilities!
b) I could personalise it with iron on transfers

Mum of the family is of French descent (her Mum was in the French Resistance, how cool is that!) and we have shared many excellent times on French family holidays over the year. Therefore I decided to use a vintage french label found on the excellent "The Graphics Fairy" blog and use put my own message inside.


They moved to the village at the same time we did so I changed the "Maison Fondee" date on Publisher. I put their family name at the top and decided that I wanted my main message to be "Home is where the heart is..." In their case they really love their home and work so hard at getting it just perfect for their family. I have to confess that my French is school girl so I used Babelfish to make sure that I got the phrasing right. I printed the Publisher document onto transefer paper and ironed it onto some calico. I appliqued the Calico panel onto the cushion front and then put the rest of it together.


They LOVED it. I was so pleased, both with the cushion and their reaction. The only problem is topping it next year!

Wednesday 4 January 2012

Christmas Card Hanger - Tutorial

(This is my first attempt at a "proper" tutorial so bear with me if I muck it up!)

We seemed to have LOADS more Christmas cards this year than in previous years (my brain boggles at the weird reason for this when everyone seems to be sending less due to Eco issues, recession, etc.)  To cut a long story short we ran out of the ribbon hangers that I had hand sewn very quickly in previous years and this year I decided that I wanted to do something a bit...nicer, I suppose.  I had seen some lovely Scandi style felt ornaments around and decided to combine that look with my tried and true ribbon hanger method.  I'm pretty pleased with the results.


WARNING!: Some of my photos feature Christmas tree tops and some feature Hearts because I made four hangers, two of each type.

Step 1:
Choose, buy and cut your ribbon to length.  I used pieces around 1.5m long (when finished) because it suits my room.  Add 15cm to the final length that you want to have when they are finished to sew into the top of the hanger and to allow you to put weights in at the bottom. I found this really cute ribbon in 10 yard reels on sale at my local Garden Centre!

Step 2:
Find or draw the shapes that you want for the tops of the hangers and cut them out of paper to make templates.  I drew the heart and cut it out myself but the Christmas tree is a piece of clip art that I pasted into MS Publisher, sized and printed out. Mine were approx 15 cm in diameter.

Step 3:
Fold your square of felt in half and pin the template to it.  Make sure that you pin through both layers.  Cut around the template using sharp fabric scissors.  When you unpin afterwards you should have two identical pieces, a front and a back.


Step 4:
Using one of your felt pieces cut a length of ribbon or rat tail that is 20cm long.  Sew the ends onto the inside of your shape using hand stitching.  Make sure they are well secured because this is what the whole thing hangs from!


Step 5:
Pin the top end of your piece of ribbon to the back felt shape that you have just sewn the hanger to. and sew a square using the sewing machine.  Be careful not to trap the hanging loop you have just made ( I learnt this the hard way).  I used a square to give it some strength.


Step 6:
Next switch to the other piece of felt that will make the front of your shape.  Inspired by Scandi style I embroidered patterns onto mine by hand using Anchor Cotton Perle and Fly Stitch.  I learnt to do Fly stitch by Googling it and following instructions (never tried it before!).  I chose to use Perle instead of Stranded Cotton because it was bolder and stood out from the background more in my view. 

For the first hanger I made I drew the line that I wanted to follow on the felt using an air fading fabric marker but after I got the hang of it I didn't need to for the others.


Step 7:
Back to the ribbon.  I wanted to weight the bottom of the ribbon so that it hung nicely and didn't move in the draughts very much.  To do this I decided to use two pence pieces but washers or similar would do just as well.


 I folded the end of the ribbon over and then over again to enclose the end, removed the coins and then pinned it in position.  When sewing the pocket closed I sewed up one side, across the end and then raised the presser foot with the needle in situ to put the coins back in and sew the whole thing closed. (It took the tip of a pair of small scissors to push the coins into the pocket).


Step 8:
Pin the embroidered front of the felt onto the back and pin into position.  Using Cotton Perle again and blanket stitch stitch around the edge until around half of it is enclosed.  Using small pieces of stuffing and a knitting needle stuff the shape until it is plump, using the knitting needle to gently push the stuffing into corners etc.

Step 9:
You will need to change technique for the blanket stitch where it crosses the ribbon so that it continues to appear the same from the front.  Finish blanket stitching around the edge, closing it completely and tie off securely.


You now have a finished card hanger, all you need are some miniature clothes pegs to suspend your cards with!  Thank you for sticking with the tutorial.  Constructive comments are always welcome.


Friday 16 September 2011

Sentimental Journey

I haven't posted in ages because, to tell you the truth, I haven't managed to finish anything!  I go through periods like that with umpteen projects on the go and none finished.  It is very depressing and I hate it. 

The end is now in sight for a number of projects though and this is the first;

I am trying to put together a gallery wall in our sitting room that is a mixture of cool images and photographs, maybe a bit of cross stitch etc.  It will be a long process but I finished the first original image that I want to include.

Hubby and I celebrate our tenth wedding anniversary this year and to try and highlight that I decided that I want to include the lyrics to "our" song (and the only dance at our entire wedding!).  I wanted them to look subtle and modern instead of sugary and sentimental though. 


I'm pretty pleased with it and still think that "The Way You Look Tonight" is a beautiful song.  Hopefully I'll post a picture of it in our gallery before too long!